
Learn how to renovate an old house in NY & CT. Our 2026 guide covers budgeting, permits, structural priorities, & hiring pros.
How to Renovate an Old House: 2026 Guide
You’re probably standing in a house with good bones, uneven floors, drafty windows, and a long list in your head that keeps changing by the hour. One minute you’re thinking about paint colors. The next, you’re wondering whether that old panel box, cracked plaster, or damp basement is about to turn your project upside down.
That’s the Hudson Valley renovation experience in a nutshell. In Westchester, Putnam, Dutchess, Orange, and nearby Fairfield County, a lot of the homes people fall for are older colonials, farmhouses, capes, and Victorians with character you can’t fake. They also come with layers of work hidden behind finished walls, under old flooring, and inside crawl spaces.
If you want to know how to renovate an old house without wasting money, start by dropping the TV version of renovation. The job isn’t picking finishes first. It’s building a sequence, protecting your budget, and making smart calls before the first wall comes down.
The Reality of Owning a Piece of Hudson Valley History
A lot of buyers in this region have the same first week in the house. They notice the original trim, the old stone foundation, maybe a built-in cabinet or wide-plank floor. Then they start living in it. Doors stick. Outlets are in odd places. A bathroom fan vents poorly or not at all. The basement smells musty after rain.
That doesn’t mean you bought the wrong house. It means you bought an old one.

Homes built before 1950 make up about 17% of U.S. homes, and owners of those homes spent a median of $1,800 annually on upkeep and repairs. Between 2019 and 2021, 61% completed at least one improvement project, with a median spend of $4,100 during that period, according to the U.S. Census Bureau’s reporting on older home costs.
Charm costs money
Old houses ask for more from owners because everything is more connected than it looks.
A cosmetic project can uncover:
- Outdated wiring hidden behind plaster
- Water damage under old bathroom tile
- Rot at trim or sills that started with a small exterior leak
- Improvised past repairs that don’t meet current code
In this part of New York and Connecticut, that’s common. Many houses have been added onto, patched, and reworked over decades by different owners with different priorities.
Practical rule: If the house is old enough to have real character, it’s old enough to deserve a plan before it gets a hammer.
What works and what doesn’t
What works is respecting the order of the job. Inspect first. Price the full scope. Demo carefully. Rebuild the bones and systems. Finish last.
What doesn’t work is starting with the kitchen mood board, opening one wall, and hoping the rest will sort itself out.
That’s where budgets get burned up. Old-house renovation succeeds when you treat the project like a sequence, not a shopping list.
Assess Before You Invest a Single Dollar in Demolition
A standard home inspection isn’t enough for a serious old-house renovation. It can point you toward issues. It usually won’t tell you the full extent of what you’re about to open up.
Before demolition starts, get a deep assessment of the structure, roof, plumbing, and electrical system. That’s the difference between a controlled project and a chain reaction.

A thorough pre-renovation survey matters because projects with surveys are completed on time 85% of the time, compared with 55% for those without. Those surveys help avoid cost overruns averaging 25%, including surprises such as asbestos, which appears in 40% of homes built before 1980, based on the methodology summarized in this pre-renovation structural assessment reference.
Start with the structure
The first question is simple. Is the house stable enough for the work you want to do?
That means checking:
- Foundation movement such as stair-step cracks, bowing, water entry, or past patching
- Framing conditions including sagging joists, undersized members, insect damage, and rot
- Roof condition from both the exterior and attic side
- Load paths before removing any wall that might be carrying weight
In older Hudson Valley homes, basements and crawl spaces tell the truth fast. Stone foundations, fieldstone walls, older beams, and pieced-together framing often show where water has been getting in and where earlier owners made rough fixes.
Look beyond what’s visible
Good assessment work starts non-invasive, then gets more targeted where needed.
A proper investigation may include:
- Visual inspection of settlement, moisture staining, roof sag, cracked plaster, and floor deflection
- Moisture meters and thermal imaging to identify wet areas and temperature anomalies
- Intrusive checks such as borescopes or selective opening where decay or damage is suspected
- Engineer review if you’re moving walls, leveling floors, changing loads, or repairing the foundation
That sequence matters. You don’t want random demolition just to “see what’s in there.” You want controlled discovery.
A wall opening should answer a question you already had. It shouldn’t create ten new ones because nobody checked first.
Don’t skip the electrical and plumbing diagnosis
Older homes in this area often still have some mix of obsolete or partial upgrades. It’s common to find a newer kitchen sitting on top of old branch wiring, or one updated bathroom tied into aging supply and drain lines elsewhere.
Have licensed trades identify:
- Knob-and-tube remnants
- Old fuse panels or undersized service
- Ungrounded circuits
- Galvanized supply piping
- Lead or unknown waste lines
- Improvised splices and abandoned runs
A lot of first-time renovators assume they can “leave most of it alone” if the lights turn on and the sinks drain. That’s risky. Once walls are open, that’s your window to fix what matters. If you miss it, you’ll pay more later to reopen finished work.
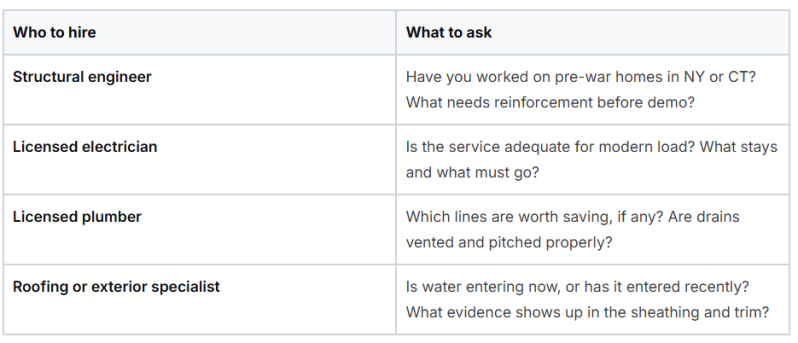
Ask the right people the right questions
An old house needs specialists, not vague reassurance.
Use this short vetting checklist when you bring people in:
What homeowners usually miss
The big misses aren’t glamorous.
They’re usually:
- Roof leaks people think are “old stains”
- Foundation cracks hidden behind storage
- Buried electrical junctions
- Bathroom venting problems
- Previous owner shortcuts that looked acceptable until the walls came open
If you’re serious about learning how to renovate an old house, this is the step that protects every dollar after it. Demo without diagnosis is gambling. Old houses usually win.
Building Your Renovation Budget and Project Roadmap
A Hudson Valley budget usually looks reasonable on paper right up until the first wall opens. Then the full costs appear. Disposal. Temporary protection. Permit revisions. A framing repair no one could confirm until finishes came off.
That is why old-house budgeting has to be tied to sequence, not just a list of rooms you want to update.
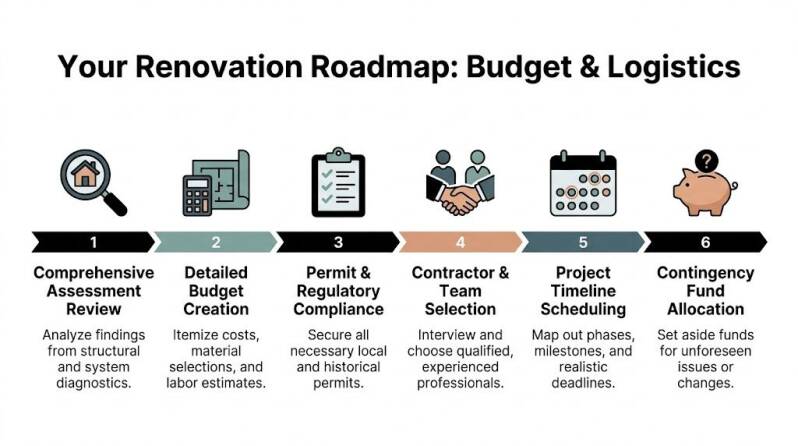
For a standard 2,000-square-foot old house, whole-home renovations average $100,000 to $200,000 and typically take 6 to 12 months. The same source notes that median homeowner renovation spend rose 60% from $15,000 in 2020 to $24,000 in 2023. You can review those benchmarks in this renovation cost breakdown for homeowners and investors.
Build the budget from the house backward
Start with the conditions already identified, then price the work in the order it has to happen. That keeps the budget grounded in the building instead of in inspiration photos.
A realistic old-house budget usually needs room for:
- Structural repairs
- Selective demolition and debris hauling
- Plumbing
- Electrical
- Insulation and wall repair
- Windows, doors, roofing, siding, or other exterior envelope work
- Kitchen and bath construction
- Flooring, trim, paint, and finish carpentry
- Permits, design, and engineering
- Contingency
A budget whole-home remodel can land in the $75,000 to $100,000 range if materials are basic and the layout stays put. Mid-range whole-home work often falls in the $100,000 to $200,000 range. Higher-end projects can exceed $250,000 when finishes, additions, or major custom work enter the picture, as noted earlier.
One line item first-time renovators miss is the work around the work. Dump fees, labor to sort salvage from trash, protection for finished areas, and a plan for junk removal and construction debris hauling all affect the total cost of the job. In older NY and CT homes, that number can grow fast once plaster, lath, old flooring, and damaged materials start coming out.
Separate house needs from finish wants
Owners get into trouble when structural and system work competes with cosmetic choices.
Use a simple filter:
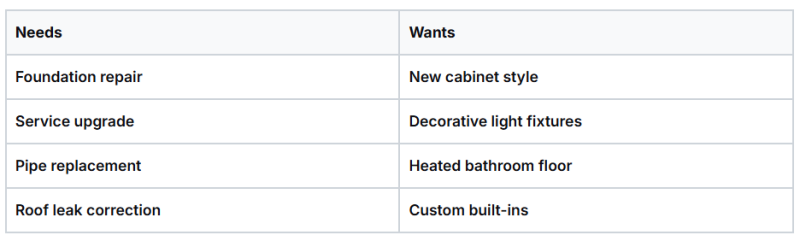
If the budget gets tight, fund the items that protect the house, make it safe, and keep future work from being torn back open.
The house does not care about tile selections if water is still getting in.
Sequence drives cost
Projects stay under better control when the order is settled before demolition starts. In old houses, the sequence usually matters as much as the scope.
A sound roadmap looks like this:
- Review findings and lock the scope
- Finalize permits, engineering, and trade coordination
- Plan selective demolition, protection, and debris removal
- Complete structural corrections
- Run rough plumbing, electrical, and HVAC
- Insulate, repair walls, and close up
- Install cabinetry, tile, trim, paint, flooring, and fixtures
- Finish punch list, cleanup, and final inspections
Get this wrong and you pay twice. I see it when an owner pushes ahead on a kitchen facelift before the rough plumbing plan is settled, or refinishes floors before heavier work is done. The result is damaged finishes, change orders, and extra labor that could have been avoided with better sequencing.
Use phases carefully
Phasing can work, but only if each phase leaves the house stable and functional. Random room-by-room upgrades usually cost more in the long run because trades have to remobilize, finishes get disturbed, and temporary fixes become permanent.
A practical phased plan often works like this:
- Phase one addresses safety issues, leaks, structural problems, and major systems
- Phase two covers kitchens, baths, and layout changes
- Phase three handles finish upgrades and exterior improvements
That approach fits a lot of Hudson Valley and nearby CT projects, especially when homeowners need to spread cost over time without making the house harder to renovate later.
Hold back money for what you cannot see yet
Hidden conditions are normal in old houses. Budget for them.
The assessment source earlier recommends budgeting 10% to 15% for surveys. Beyond that, hold a separate contingency for discoveries during demolition and for owner-driven changes. Once walls and floors open, crews may find wet framing, failed subflooring, chimney issues, or older repairs that will not support new finish work.
That reserve protects the schedule too. Without it, owners start making rushed decisions mid-project, and rushed decisions are expensive.
Where budgets usually break down
Cost overruns often come from timing and indecision more than from unit prices.
The patterns are predictable:
- Late fixture and finish selections
- Scope creep after demolition starts
- Layout changes after trade work is priced
- Trying to save materials that are too damaged to reuse
- Ordering finish items before field measurements are confirmed
The cleaner jobs in this region follow a simple rule. Decide early what must be repaired, what is worth preserving, and what should be replaced to current standards. That is how you protect the character of an old house without letting sentiment wreck the budget or the schedule.
Smart Demolition and Eco-Friendly Debris Management
Demolition is where many old-house projects either get organized or get sloppy fast. People tend to think of demo as brute-force work. In a good renovation, it’s the opposite. It’s controlled, selective, and tied directly to what the rebuild needs.
That matters even more in older NY and CT homes, where walls, flooring, trim, and insulation can hide hazards, salvageable materials, and a lot more debris than first-time renovators expect.

Most renovation guides barely touch the practical side of safe demolition, hazardous material handling, and debris removal. That leaves homeowners without much guidance on balancing preservation with deconstruction or what to do with salvageable material and waste streams, as noted in this old-house renovation planning gap discussion.
Smart demolition means selective demolition
In an old house, demo should answer three questions before work starts:
- What are you removing to expose structural and system work?
- What are you protecting because it has architectural or reuse value?
- What requires special handling because it may be hazardous?
That’s not overthinking it. It’s the difference between an efficient job and avoidable damage.
A selective demolition plan usually identifies:
- Elements to preserve such as original trim, flooring sections, doors, built-ins, or stone
- Areas to open surgically for plumbing, wiring, and framing access
- Materials requiring testing or controlled removal
- A disposal path for mixed debris, recyclables, and donated items
Why DIY demo often costs more than it saves
Homeowners are often tempted to do their own tear-out to save labor. Sometimes that works for loose finishes in a simple room. In older homes, it often creates problems.
Common DIY demo mistakes include:
- Breaking materials that could’ve been salvaged
- Opening more wall and ceiling area than necessary
- Mixing debris so recycling and hauling become harder
- Ignoring dust containment
- Disturbing suspect materials without proper testing and handling
The hidden cost is lost control. Once the house turns into a pile of mixed debris, every next step gets harder. Trade access gets worse. Cleanup takes longer. Good materials get damaged. The site becomes less safe.
Clean demo saves rebuild time. Messy demo steals it.
Keep debris moving, not piling up
A renovation site runs better when debris leaves continuously instead of collecting in corners, porches, basements, and driveways.
That matters for a few reasons:
- Trades need access
- Safety improves when pathways stay clear
- You can inspect framing and systems better in a clean shell
- Moisture and pest problems are easier to spot
- Neighbors notice less chaos
For homeowners who want one crew to handle removal, hauling, and cleanup as the site evolves, D&B Complete Home Services INC. provides junk removal services across the local NY and CT service area.
Think about salvage before the first swing
Old houses often contain materials worth saving even if they won’t go back in the same room.
You may be able to keep or repurpose:
- Solid wood doors
- Cabinet boxes
- Hardware
- Old-growth framing lumber
- Radiators
- Stone, brick, or pavers
- Light fixtures and mirrors
That only happens if someone identifies salvage early. Once debris is mixed, dust-covered, and stacked outdoors in bad weather, the value drops fast.
A short look at the demolition phase helps make that concrete:
Eco-friendly disposal is planning, not wishful thinking
A cleaner waste stream comes from separation and timing.
Wood, metal, fixtures, masonry, cardboard, and general debris don’t all belong in one heap. If you want to reduce landfill impact, somebody has to sort material, stage it correctly, and haul it with a plan.
That’s why demolition isn’t just destruction. In an old-house renovation, it’s site preparation, hazard awareness, material recovery, and logistics all at once.
Prioritizing the Unseen Systems and Structural Work
Once the house is opened up, the temptation is to think the hard part is over. It isn’t. This is the stretch that determines whether the finished house will perform well.
What matters now is the work nobody compliments in the final walkthrough. Framing correction. Proper rough-ins. Straightforward access. Solid service upgrades. Dry assemblies. Clean inspections.
Fix the shell before you beautify it
If floors are out of level, joists are compromised, or a load path is questionable, now is when those issues get corrected. Not after trim is installed. Not after cabinets are templated.
The same goes for moisture entry and exterior weaknesses. If a roof issue, wall leak, or basement water problem is still active, interior finishes are on borrowed time.
A lot of old homes in this region have had piecemeal work done over decades. You’ll often find one area updated nicely while adjacent framing or utility work was left untouched. That’s why the shell has to be treated as a whole system.
Rough plumbing and electrical come next
After demolition, the right order is to reroute plumbing to PEX or CPVC, then upgrade electrical from older 60A fuse boxes to 200A panels with modern AFCI/GFCI breakers. That phase can take 4 to 12 weeks, and it’s central to safety and code compliance, according to this room-by-room systems upgrade guide.
That sequence makes sense in the field.
Plumbers need open paths for supply and drain changes. Electricians need clear framing access after the pipe routes are established. If both trades are working from an organized demolition plan, they can coordinate penetrations, wall cavities, chases, fixture locations, and future access.
Why this phase shapes the finished house
A nice finish package can’t rescue a bad rough-in.
Poor early decisions show up later as:
- Circuits where you need extension cords
- Weak kitchen and bath layouts
- Pipes in the wrong wall
- Panels buried in bad locations
- Fixtures that don’t line up cleanly
- Bulkheads and patches that advertise earlier mistakes
The best time to think through daily life in the house is while the walls are open. Where do you need outlets? Which walls should stay clear? Where will shutoffs be accessible? Does the bathroom layout support proper venting and drainage?
If a wall is open, use that opportunity fully. Old houses rarely give you cheap second chances.
A field checklist for this stage
Use this as a working review before close-up:
Structural items
- Sistering or replacing damaged framing
- Reinforcing altered load-bearing areas
- Subfloor repairs where water damage existed
- Correcting framing left rough from old remodels
Plumbing decisions
- Replacing aged supply lines
- Confirming drain and vent paths
- Planning shutoff access
- Setting fixture locations before walls close
Electrical decisions
- Service size for modern living
- Dedicated circuits where needed
- Panel location
- Switch and outlet placement that matches furniture and workflow
What not to do here
The most expensive mistake in this phase is rushing to close walls because the project has felt messy for too long.
Don’t cover up work until you know:
- the structure is corrected,
- the rough plumbing is where it belongs,
- the electrical plan matches real use,
- and inspections are satisfied.
A clean finish starts here, not in the paint aisle.
Deciding Between DIY and Hiring Professional Contractors
Most homeowners don’t need to choose between doing everything themselves and handing off the entire project. The smarter question is which parts are worth doing yourself, which parts require licensed trades, and which parts are better outsourced because they’re messy, risky, or time-sensitive.
That’s especially true in old houses, where one “simple” job often touches three hidden issues behind it.
The practical split
Some work is reasonable for a capable homeowner.
That usually includes:
- Painting
- Basic finish carpentry
- Hardware changes
- Cabinet hardware and shelving
- Cleanup and organizing saved materials
- Some finish demolition after hazards and scope are confirmed
Then there’s work that should stay with professionals.
That includes:
- Structural changes
- Service upgrades
- New electrical runs
- Plumbing replacement
- Roofing and water-intrusion correction
- Hazardous material handling
- Permit-driven work
A third category gets overlooked. Work that isn’t always legally restricted but still makes sense to outsource for efficiency.
That usually includes:
- Selective demolition
- Debris hauling
- Estate cleanout or turnover prep
- Heavy material removal
- Site cleanup between phases
The sequencing trap
Many renovation guides underplay sequencing, and that leads owners to tackle cosmetic work before structural or system work. That mistake drives budget overruns because roof, foundation, or electrical problems become more expensive once the project is underway, as described in this older-home renovation sequencing guidance.
That’s why DIY decisions should be made by sequence, not by enthusiasm.
For example, painting a room yourself is fine. Painting it before the electrician opens walls is wasted effort. Installing your own vanity hardware makes sense. Installing the vanity before the plumbing layout is confirmed does not.
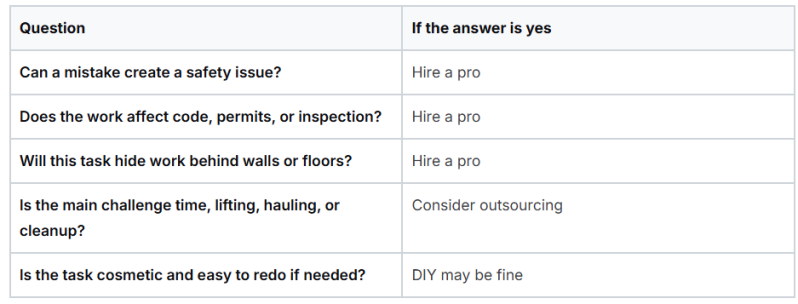
Use a risk and access test
When homeowners ask whether they should DIY a task, this test usually gives the right answer.
Vetting contractors in this area
For Westchester, Putnam, Dutchess, Orange, and nearby CT work, ask direct questions.
Look for:
- License and insurance appropriate to the trade
- Experience with older homes, not just new builds
- Clear scope language
- References from comparable jobs
- A realistic explanation of sequence
- Willingness to say no to bad ideas
If you’re lining up estimates or need help figuring out the right scope before work starts, you can contact D&B Complete Home Services INC. for local project discussion and service availability.
The strongest contractors don’t just promise a finished look. They can explain why the job has to happen in a certain order.
Bringing Your Vision to Life and Preparing for Market
Once the structure is sound, the systems are modernized, and the site has stayed organized, the visible part of the renovation becomes much easier. This is when finishes hold up. Cabinets fit as planned. Floors go down on stable framing. Trim lands against walls that were rebuilt correctly.
That’s the payoff for doing the job in the right order.
For homeowners staying long term, the house begins to feel like yours. You can make thoughtful choices about paint, tile, lighting, flooring, hardware, and storage without worrying that a hidden issue is waiting to tear it back apart.
For owners preparing a property for sale, market-readiness is more practical than dramatic.
Focus on:
- A clean and complete exterior
- Fresh but durable finishes
- Working systems
- Clear rooms with no leftover debris
- Repairs that remove buyer objections
- A crisp final cleanup
Before-and-after planning helps here because it keeps decisions grounded in real transformation, not impulse. You can see examples of that approach on the D&B Complete Home Services INC. before and after page.
Buyers and appraisers notice quality in the basics first. A house that feels dry, solid, bright, and well-kept usually presents better than one packed with flashy finishes over unresolved problems.
Old-house renovation is demanding, but it’s worth doing well. The homes in the Hudson Valley and nearby Connecticut have a kind of permanence that newer houses often don’t. When you respect the sequence, protect the budget, and handle demolition and rebuilding with discipline, you keep the character and lose the chaos.
If you’re planning to renovate, clean out, demolish, repair, or get a property market-ready in New York or Connecticut, D&B Complete Home Services INC. offers junk removal, demolition, remodeling, and home repair for residential and commercial properties across the region.
Add comment
Comments