Your step-by-step storage clean out plan. Learn how to sort, dispose, and declutter your unit. Get tips for NY/CT and know when to hire a pro.
Storage Clean Out Guide: From Chaos to Clear
You open the storage unit to “just take a look,” and the door barely clears the first stack of boxes. There’s old furniture in the back, loose bags in the front, paperwork you don’t want to lose, and at least a few things you forgot you even owned. For homeowners, that usually turns into a delayed weekend project. For landlords and property managers in New York and Connecticut, it can turn into a turnover problem, a liability problem, or both.
Storage clean out work looks simple from the outside. In practice, it’s part logistics, part decision-making, and part disposal planning. If the unit involves abandoned tenant property, estate contents, water damage, or heavy debris, the job gets more complicated fast.
That’s also why demand stays steady. As of 2024, the U.S. has 52,301 self-storage facilities with a 96.5% occupancy rate, and about 10% of American households rent a unit according to self-storage industry statistics compiled here. People keep more than fits in the house, then life changes, and the unit becomes the holding place for unfinished decisions.
Your Pre-Cleanout Game Plan
A messy storage clean out usually starts with a rushed first trip. Someone shows up with coffee, a few garbage bags, no masks, no labels, and no exit plan for the furniture. That approach burns energy before the essential work starts.
A better start is to treat the unit like a short project with a clear finish line.

Pick the primary target
“Clean out the unit” is too vague. You need one of these goals:
- Full vacancy: Everything leaves the unit. This is common when ending a rental, preparing for an estate settlement, or handling a turnover.
- Access restoration: You’re not emptying it. You’re creating walkable space and finding key items.
- Downsize and reset: You’re keeping the unit, but only for items worth storing.
That decision changes everything. It affects how many people you need, what vehicle you need, and whether you should even start selling individual items during the cleanout.
Practical rule: If your goal is full vacancy, don’t create a “decide later” area inside the unit. That pile is how a one-day job turns into another month of rent.
Set the date like a project manager
In NY and CT, timing matters more than people think. Rain complicates loading. Heat makes dusty units miserable. Local transfer station and donation center hours can cut your day short if you don’t check them in advance.
Before you commit to a date, confirm:
- Access hours at the storage facility
- Dump or transfer station hours
- Donation drop-off rules
- Elevator or loading dock rules if the unit is part of a managed property
- Who’s helping and when they’ll arrive
If you need a practical planning checklist, D&B’s junk removal tips and resources can help you think through the prep work before the hauling starts.
Build a cleanout kit
You don’t need fancy gear for every storage clean out, but you do need the basics ready before the first box comes out.
Bring:
- Work gloves: Dust, splinters, and sharp edges are common.
- Masks: Older units often have heavy dust, rodent droppings, or mildew smell.
- Contractor bags: Regular kitchen bags tear too easily.
- Markers and labels: If boxes are getting reopened, relabel them on the spot.
- Dolly or hand truck: This matters if there’s furniture, file boxes, or appliances.
- Broom, paper towels, and cleaner: You’ll want a quick final sweep.
- Water and snacks: Decision fatigue gets worse when people are tired and rushing.
Decide the first hour before you arrive
The most productive cleanouts start with a predetermined first hour. Don’t stand in the doorway debating where to begin.
Use a simple opening sequence:
- Front sweep: Remove obvious trash and loose bags near the entrance.
- Photo pass: Take quick photos before moving major items, especially if ownership or value could be disputed later.
- Heavy-item check: Identify dressers, shelving, mattresses, and anything that blocks access.
- Category staging: Mark where keep, donate, sell, recycle, and trash will go.
That first hour creates momentum. It also shows you whether the job is manageable as planned or whether you need more labor, more vehicle space, or a different disposal plan.
The Sorting System That Works Well
Many storage clean outs don’t fail because the unit is too full. They fail because people make too many slow decisions in a row.
When every box contains mixed items, sentiment, paperwork, and things you might use someday, your brain starts bargaining. That’s when clutter stops being a hauling problem and becomes a decision problem.
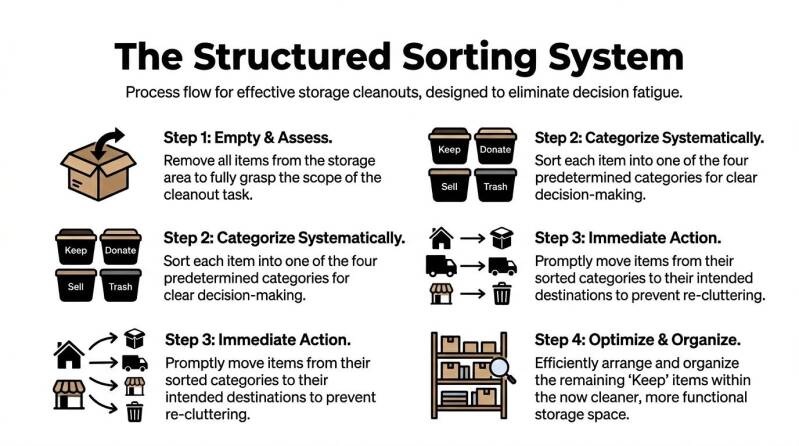
Professionals usually solve that with a five-category sorting system: keep, donate, sell, recycle, trash. According to this storage unit cleanout guide, that method can boost efficiency by 30%, and for a typical 10x10 unit, the sorting phase takes two workers about 4 to 6 hours.
Use hard rules, not feelings
You need rules that are clear enough to apply when you’re tired.
Keep means this: the item has a known owner, a real use, and a specific place to go after the cleanout.
Donate means this: usable, clean, and worth someone else handling.
Sell means this: enough resale value to justify the time.
Recycle means this: not trash, but not suitable for donation.
Trash means this: broken, contaminated, unsafe, or not worth processing.
That’s stricter than many individuals want at first. It’s also why it works.
A box of holiday decor with a home in your basement is keep. A side table with one loose leg might be sell if it has value and you’ll list it this week. A cracked plastic shelf is usually trash. Old electronics often belong in recycle, not in a donation pile.
Sort by zone, not by memory
Don’t bounce from one “interesting” box to another. Work the unit in small zones.
A good pattern is:
- Start at the entrance: clear floor space first.
- Move left to right: keep direction consistent so you don’t re-handle the same pile.
- Pull large items early: they hide smaller contents and block movement.
- Open every closed container: labeled boxes are often wrong.
One of the biggest mistakes I see is people creating pretty piles without any transport plan. A donation pile that sits for two weeks is just cleaner-looking clutter.
Make each category physically distinct
If you have the room, use bins, tarps, or taped floor areas. Color helps. Even simple painter’s tape labels on the floor can keep the job moving.
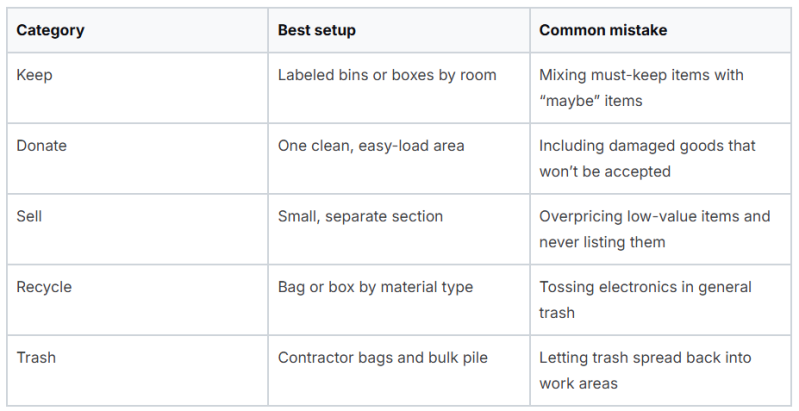
Try this setup:
Don't let the sell pile run the job
Selling sounds like the smart option. Sometimes it is. But storage clean out projects stall when every lamp, chair, or tool becomes a marketplace decision.
Use a simple test. If you can’t photograph it, list it, and move it quickly, it probably shouldn’t stay in the sell category.
The most expensive item in a storage unit is often indecision. It keeps rent running, delays turnover, and forces you to touch the same box more than once.
Protect the items that matter
Before the heavy sorting gets underway, pull out anything that could create real trouble if lost:
- Personal documents
- Photos and albums
- Jewelry
- Small safes or lockboxes
- Medication
- Tax records and legal papers
- Family keepsakes
Put those in one protected container and move it out of the work zone. You don’t want passports or estate paperwork sitting under a broken floor lamp and three garbage bags.
Logistics of Letting Go in NY and CT
Sorting is only half the job. The hard part for many people is what happens after the piles are made.
A clean storage clean out needs an exit path for every category. In New York and Connecticut, that means thinking beyond “trash or keep.” Furniture donation has intake rules. Electronics often need special handling. Mattresses, paint, fuel, and yard equipment can’t always go out with ordinary junk.
Build the exit plan before the piles grow
For homeowners, the smoothest jobs usually move in this order:
- Keep items leave first: get them out of the work area and into a car, van, garage, or designated room.
- Donation gets scheduled, not wished for: confirm the receiving location will take what you have.
- Recycling gets separated early: electronics and similar items shouldn’t get mixed into general debris.
- Trash gets consolidated for one haul: scattered bags waste loading time.
If you’re dealing with old outdoor tools or equipment mixed into the unit, this guide on how to dispose of old lawn equipment is a useful example of why disposal needs to be item-specific.
The landlord problem many DIY guides skip
For landlords and property managers, disposal isn’t just a logistics issue. It’s a documentation issue.
According to this summary of the gap in landlord guidance, 28% of U.S. evictions involve hoarded storage, and 65% of managers cite “unknown item ownership” as a top delay. It also notes that proper handling under state laws such as NY RPL § 232-a is essential.
That matters because a storage clean out tied to a tenant turnover isn’t the same as cleaning out your own garage. If ownership could be disputed, speed without paperwork can create liability.
What landlords should do before removal
If the unit or storage area may contain abandoned tenant property, slow down and document first.
A practical sequence looks like this:
- Photograph the space as found. Wide shots first, then close-ups of anything valuable or questionable.
- Keep an inventory log. It doesn’t have to be fancy. It does need to be consistent.
- Separate obvious personal records. Documents, IDs, and legal files should be handled carefully.
- Check notice requirements. NY and CT obligations can vary by property type and situation.
- Avoid informal disposal. Don’t let maintenance staff, neighbors, or new tenants pick through the contents.
If the situation involves an eviction, abandonment, or a contested move-out, it’s smart to confirm the legal process with counsel before disposal. The cleanout crew can move material. They can’t make legal assumptions for you.
Fast turnover helps nobody if the process creates a claim later.
Eco-friendly disposal is practical, not just idealistic
In this region, landfill-only thinking usually costs more time and more money. Mixed loads are slower to manage, and some items don’t belong in general disposal.
The most workable mindset is this: donate what’s accepted, recycle what requires special handling, and dump only what has no better path. That keeps the cleanout cleaner, reduces rejected loads, and limits the need to re-sort material after you thought the job was done.
Estimating Your Storage Clean Out Cost and Timeline
Typically, the cost question is asked first. The better first question is how much re-handling the job will require.
A storage clean out gets expensive when items are touched too many times, hauled in the wrong vehicle, or dumped without separating materials that should’ve been donated or recycled. Time and disposal mistakes are what usually push the budget higher.

What the numbers look like
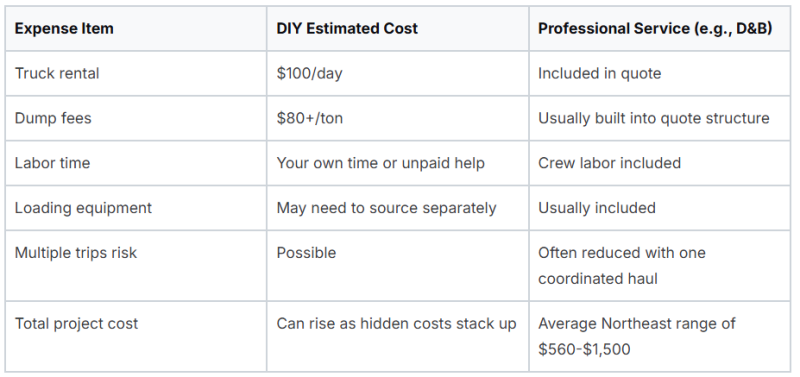
For the Northeast, this pricing reference says a professional storage cleanout for a 10x10 unit averages $560 to $1,500. The same source notes that DIY can look cheaper at first, but truck rentals at $100 per day and dump fees of $80+ per ton add up quickly. It also states that professional service can be 15% to 20% more economical than DIY when all factors are counted.
That range makes sense in the field because not all 10x10 units are equal. One unit holds labeled household overflow. Another holds soaked furniture, broken shelving, loose bags, and mixed debris. Same footprint. Very different job.
DIY vs Professional Cleanout Cost Comparison (10x10 Unit)
How to judge the timeline realistically
For a standard 10x10 with average household contents, sorting alone can take a solid work block for a small team, as noted earlier. But timeline is driven less by square footage than by density and decision speed.
A cleanout tends to run longer when:
- Boxes are unlabeled or mixed
- There are many sentimental items
- Furniture must be disassembled
- You plan to sell things during the process
- The disposal route isn’t scheduled ahead of time
- Access is limited by facility rules or narrow loading areas
A faster cleanout usually has one defining feature: decisions are made in real time and the exit routes are already arranged.
The hidden budget killer
The hidden cost in DIY isn’t only the truck or dump fee. It’s the second day, then the third trip, then the month of continued storage rent because the “last load” never happened.
If you’re comparing DIY against a quote, use this checklist:
- Count all disposal trips
- Include fuel and tolls
- Include equipment you don’t own
- Include your lost weekend
- Include the risk of keeping the unit longer than planned
That’s how you get a real number. Not by comparing a full-service quote against the fantasy version of DIY where everything fits in one load, nobody gets tired, and the dump line is empty.
When to Call the Pros D&B Complete Home Services
Some storage clean out jobs are perfectly reasonable for a homeowner with a free day, a helper, and a clear plan. Others stop being DIY the minute you open the door.
If the job involves hazards, legal sensitivity, estate contents, or a tight turnover deadline, it makes sense to hand it off.

Safety red flags you shouldn't ignore
For commercial or estate cleanouts, this hazard-focused guide notes that 15% to 20% of cluttered spaces contain hazards. It also says professionals use OSHA-compliant PPE, and that a zoned approach with proper equipment can triple operational efficiency and prevent 80% of common accidents.
That lines up with what crews see on real jobs. The danger usually isn’t dramatic. It’s ordinary things stacked in bad ways.
Watch for:
- Mold or heavy mildew smell
- Rodent droppings or insect activity
- Broken glass hidden under bags or paper
- Overloaded shelving
- Very heavy furniture in tight spaces
- Unknown chemicals, paints, or fluids
- Sharp metal, old tools, or exposed fasteners
A unit can look manageable from the doorway and still be unsafe once the front row comes out.
Jobs that need more than labor
A professional crew isn’t only there to lift heavy items. They bring process.
That matters most when the cleanout includes:
- Estate property with valuables mixed into debris
- Landlord turnovers with documentation needs
- Commercial storage rooms with bulky inventory
- Units packed floor-to-ceiling
- Properties that need to be market-ready fast
These are the jobs where organization matters as much as hauling. Someone has to control the sequence, keep categories moving, protect important items, and finish with the unit cleared.
If the cleanout affects a closing date, a rental turnover, or an estate timeline, delay is usually more expensive than the hauling bill.
What professional help should include
A competent service should make the job simpler, not just faster. At minimum, you want:
- An on-site assessment or clear scope review
- A quote tied to the actual contents
- Crew labor and hauling
- A disposal plan
- Basic cleanup after removal
- Clear communication about what won’t be taken
If the unit is part of a broader property reset, one practical option is D&B Complete Home Services’ junk removal services, which cover residential and commercial removal work in New York and Connecticut.
When DIY stops making sense
People usually know when they’ve crossed the line. It happens when they spend the first hour moving things around and nothing leaves. Or when they realize the old filing cabinet weighs more than expected. Or when they find tenant records mixed with obvious trash and don’t know what can legally be discarded.
At that point, the smart move isn’t to push harder. It’s to change the plan.
Call for help when:
- You need the unit emptied on a deadline
- The contents involve legal sensitivity
- The debris includes hazardous or questionable materials
- The volume exceeds your vehicle and labor capacity
- The cleanout is delaying a renovation, listing, or turnover
That decision saves wear on your back, your schedule, and your judgment. Storage clean out work is tiring, and tired people make bad keep-or-toss decisions.
What works in the field
The best outcomes usually come from a simple combination. Document first. Sort with strict categories. Move material out continuously. Keep legal and disposal issues from becoming last-minute surprises.
What doesn’t work is the opposite. Wandering through the unit, reminiscing over every box, stacking “maybe” piles, and figuring out disposal after dark. That’s how the cleanout drags on and the unit ends up only half cleared.
For homeowners, the right plan often turns a dreaded project into one hard but manageable day. For landlords and managers, the right process protects the property and the paper trail at the same time.
If you need help clearing a packed unit, handling a sensitive turnover, or getting a property ready for its next step, D&B Complete Home Services INC. provides junk removal and cleanout support for homeowners, landlords, property managers, and commercial clients across New York and Connecticut.
Add comment
Comments