
Thinking about removing a jacuzzi tub? This practical guide walks you through the entire process, from planning and tools to demolition and disposal.
A Homeowner's Guide to Removing a Jacuzzi Tub
Before you even think about picking up a sledgehammer, remember that a successful jacuzzi removal is all about the prep work. Rushing in is the fastest way to deal with a flooded bathroom or, worse, a dangerous electrical shock. This initial stage is all about making the work area safe and contained.
Your Pre-Removal Game Plan And Checklist
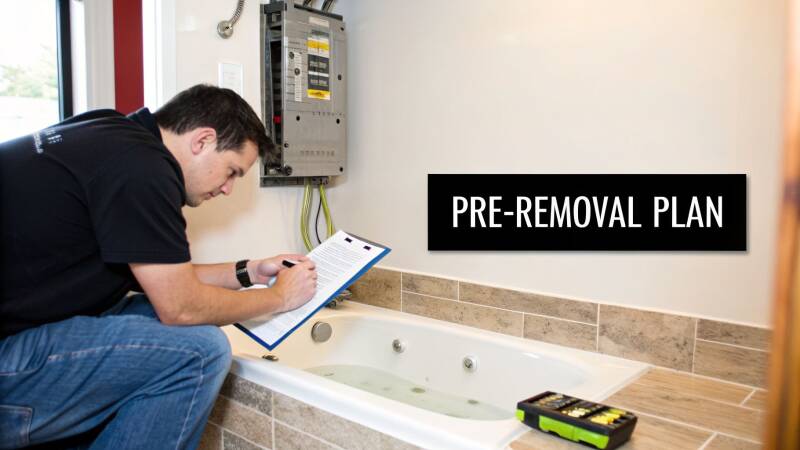
A good plan is what separates a smooth project from a weekend-long disaster. Before a single tile is chipped, you need to completely isolate the tub from your home's systems and protect the surrounding space. It’s less about brute force and more about smart, safe setup.
Securing Water and Electrical Connections
First things first: shut everything down. You need to cut off both the water and power feeding the tub. Don't just turn a knob under the sink—go right to the source.
Your home’s main water shut-off valve is usually in the basement, a crawl space, or a utility closet. Turn it clockwise all the way until it stops. To be sure the lines are empty, open a faucet on the lowest level of your house and let it drain completely.
Next up is electricity. Jacuzzi tubs are power-hungry and almost always have their own dedicated circuit. Head to your main electrical panel and find the breaker labeled for the jacuzzi or master bathroom. Flip it firmly to the "OFF" position.
Pro Tip: I never trust a breaker label alone. After flipping it, I always double-check with a non-contact voltage tester. Wave it over the tub’s motor and control panel to be 100% certain the power is dead. It's a five-second check that could save your life.
Checking Local Codes And Permit Requirements
Here’s a step that trips up a lot of DIYers: permits. You might think you're just removing an old fixture, but your local municipality could see it as plumbing alteration or minor demolition. That often requires a permit.
A quick phone call or a visit to your local building department's website will give you a clear answer. Skipping this can lead to fines down the road, especially when you sell your home. It's always better to ask first.
Preparing The Bathroom and Creating an Exit Path
Now it’s time to prep the room itself. Trust me, demolition is messy. You'll be surprised by how much dust and debris a jacuzzi removal kicks up.
Here’s a quick checklist to get the space ready:
- Empty the Room: Get everything out—shampoo bottles, towels, rugs, decorations. Anything you don't want covered in dust, remove it.
- Protect Your Surfaces: Cover the floor with heavy-duty plastic sheeting or, even better, ram board. Use painter's tape to secure the edges and protect your vanity and toilet.
- Map Your Escape Route: You'll be hauling out large, heavy, and awkward pieces. Clear a wide path from the bathroom, through the house, and out the door. Protect the floors along this entire route with drop cloths.
This prep work doesn't just prevent a massive cleanup job; it makes the whole process safer by eliminating trip hazards. Thinking through these steps also helps you gauge the true scope of the project and decide if going DIY is the right call. The cost can be a major factor here. For instance, professional hot tub removal costs can range anywhere from $150 to $800, depending on the situation. In-ground models are a whole different beast and can easily top $1,000 to remove, especially if they're built into a deck or located indoors.
For more helpful advice on handling the debris from your project, take a look at our guide on essential junk removal tips.
DIY vs Professional Removal Cost and Effort Breakdown
Deciding whether to tackle this yourself or call in a team like ours often comes down to a trade-off between your time, budget, and comfort level with demolition. Here’s a quick breakdown of what to expect.
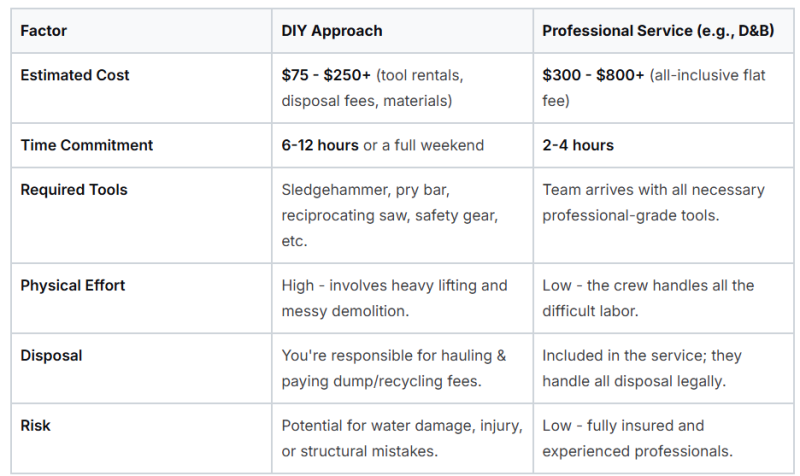
While a DIY approach can save you a few hundred dollars upfront, the time, effort, and risk involved are significant. Hiring a professional service offers peace of mind and gets the job done quickly and safely, without you having to lift a finger or figure out where to dump the debris.
Getting Your Arsenal Ready: Tools, Supplies, and Safety Gear
Nothing kills a project's momentum faster than realizing you're missing a crucial tool halfway through the job. Before you even think about swinging a hammer, let's get everything you need lined up. A well-stocked toolkit is the line between a smooth, satisfying project and a weekend filled with frustrating trips to the hardware store.
For the demolition work, you'll need some muscle. A reciprocating saw is going to be your workhorse for cutting through the tub's frame and shell. But here's a pro tip: the saw is only as good as its blade. Make sure you grab a multi-pack of demolition blades—the kind designed to chew through wood, nails, and plastic without complaining.
You'll also want a small sledgehammer, somewhere in the 4-6 pound range. It’s perfect for cracking the tub shell without risking damage to the wall framing behind it. A good pry bar and a classic claw hammer are also non-negotiable for dismantling the wooden support structure the tub sits in.
Tools for the Finesse Work: Plumbing and Electrical
Once the tub's surround is gone, you're dealing with the plumbing and wiring. This is where brute force gives way to the right tool for the job. Old plumbing fittings can be incredibly stubborn.
Here’s a quick list of what to have within arm's reach:
- Adjustable Wrenches: Get two. You’ll often need one to brace a pipe while you turn the fitting with the other. Trust me on this.
- Pipe Wrench: That one corroded connection will laugh at an adjustable wrench. The extra grip and leverage from a pipe wrench will be a lifesaver.
- Channel-Lock Pliers: Incredibly handy for gripping all sorts of things, from PVC pipes to stubborn nuts.
- Voltage Tester: This is an absolute must-have. Never, ever touch a wire without first confirming the power is off using a non-contact voltage tester on the motor and controls.
A little piece of advice from experience: always have a spare battery charging for your cordless tools and an extra pack of saw blades on standby. The last thing you want is for your saw to die mid-cut, completely halting your progress.
The Most Important Part: Your Protective Gear
Let's be clear: demolition is messy and can be dangerous. You'll be dealing with fiberglass dust, sharp plastic shards, and flying debris. Protecting yourself isn't optional; it's the most critical step in this whole process.
Don't even start without this basic Personal Protective Equipment (PPE):
- Full-Coverage Safety Goggles: Standard safety glasses won't cut it. You need a pair that seals around your eyes to keep out fine dust and flying debris.
- Heavy-Duty Work Gloves: Get a pair with good grip and reinforced palms. They'll save your hands from splinters, cuts, and blisters.
- Dust Mask or Respirator: Cutting into fiberglass or acrylic kicks up nasty particles you really don't want in your lungs. An N95-rated mask is the bare minimum.
- Steel-Toed Boots: A dropped tool or a heavy piece of the tub can do serious damage to your feet. It's just not worth the risk.
- Long Sleeves and Pants: Keep your skin covered to avoid scratches and irritation from that itchy fiberglass dust.
Taking the time to gather all this gear upfront does more than just make the job easier—it ensures you can get it done safely, without turning a DIY project into a trip to the emergency room.
Alright, with all the prep work squared away, it’s time for the main event: getting that old tub out of your bathroom. This isn't about just swinging a sledgehammer wildly. A smart demolition is a calculated process, moving from careful disconnection to controlled deconstruction. The goal is to get the tub out without taking half the bathroom with it.
First things first, you've got to cut the tub's lifelines—the plumbing. You've already shut off the main water and drained the lines, so now it's time to get to the tub's supply and drain connections. You'll usually find these behind a small access panel, either in the wall or on the side of the tub's frame, typically near the motor.
Grab two adjustable wrenches for this job. You’re probably wondering, why two? Old plumbing fittings have a nasty habit of twisting the entire pipe when you try to loosen them. You’ll use one wrench to brace the pipe itself, holding it steady, while you use the second to turn the stubborn fitting. This little trick is what separates a clean removal from a plumbing nightmare that involves cracking a pipe hidden inside the wall.
Handling Stubborn Plumbing Connections
It's almost a guarantee you'll run into corroded or seized-up fittings, especially on older tubs. If a connection just won't budge, don't just muscle it. That's how things break. Instead, spray it down with a penetrating oil like WD-40 and give it about 15 minutes to work its magic. You'd be surprised how often this does the trick.
If that doesn't cut it, it's time to bring in the big guns: a pipe wrench. Its toothed jaws give you a much better grip than an adjustable wrench, providing the leverage you need to finally break that connection free. Just remember to be firm but controlled.
Safely Disconnecting the Electrical System
With the water lines disconnected, it's time to tackle the electrical wiring. This is the part you absolutely cannot rush. Even with the breaker off, you have to prove to yourself that the power is dead at the source.
Take your non-contact voltage tester and hover it over every wire connected to the tub's motor, pump, and control panel. The tester will light up or beep if it senses any current. If it stays silent, you're good to go.
Using a screwdriver, take off the cover on the motor's junction box. Inside, you'll see wires joined by wire nuts. Snap a quick photo of the setup before you touch a thing—it's a great habit to get into. Then, carefully unscrew the wire nuts and pull the wires apart. Make sure to cap off each wire coming from the wall with a fresh, correctly-sized wire nut to keep things safe.
Crucial Takeaway: Don't ever trust a circuit breaker alone. A faulty breaker or a mislabeled electrical panel can create a live-wire situation. Your voltage tester is the final, non-negotiable safety check before you lay a hand on any wiring.
This diagram lays out the essential gear you'll need as you move through the removal process.
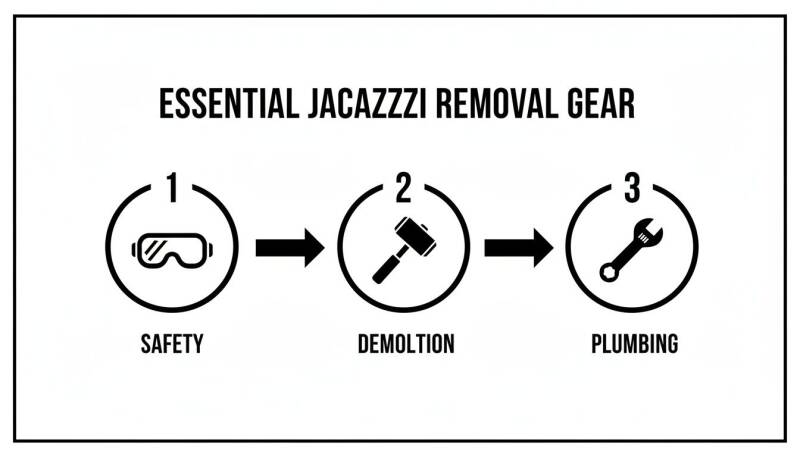
Notice how it flows from safety gear to demolition tools to plumbing wrenches. This highlights a methodical approach: protection and precision always come before brute force.
Choosing Your Demolition Strategy
Now that the tub is completely disconnected, it's just a big piece of plastic or metal in your way. You basically have two ways to get it out: the "break-down" method or the "deconstruction" method. Which one you choose really depends on what the tub is made of and how it’s installed.
- The Break-Down Method (For Fiberglass/Acrylic Tubs)
This is the go-to for most standard fiberglass or acrylic tubs. The idea is simple: cut the tub into smaller, more manageable pieces that you can actually carry out the door.
- Make Your Cuts: Fire up your reciprocating saw (with a fresh demolition blade) and start cutting the tub shell into sections. A cross-pattern to create four quarters is usually a good plan.
- Apply Some Force: Once you have your cut lines, a few solid whacks with a small sledgehammer will break the pieces apart. Make sure your safety gear is on, because fiberglass creates nasty, sharp shards.
- Dismantle the Frame: After the shell is gone, use a pry bar and hammer to take apart the wooden support frame it was sitting on.
This method is fast, but it’s messy. It creates a ton of dust and sharp debris, so good ventilation and a thorough cleanup are non-negotiable.
- The Deconstruction Method (For Cast Iron or Preserving Tile)
If you're dealing with a heavy cast iron tub or want to save the beautiful tile deck it’s built into, smashing it to pieces is not an option. This method is all about carefully disassembling the tub's surround so you can lift the whole unit out in one piece.
This is a much slower, more delicate process. It involves carefully removing tile, backer board, and framing just to get enough clearance to lift the tub. And when you consider that an empty cast iron tub can weigh 300-500 pounds, this is definitely a job for several people or professional movers.
Imagine your jacuzzi is the centerpiece of a large, tiled platform. Breaking it would mean destroying the entire deck. Instead, you'd have to painstakingly chisel away the tile and grout right at the tub's lip. Then, you'd need to get underneath or behind it to free it from its supports and slide it out. This saves your finishes but takes a ton of time and skill. For most homeowners facing this scenario, the smartest move is to call in a professional service like D&B Complete Home Services INC.
Managing Debris and Smart Disposal Options
So, the jacuzzi is out. Congratulations! Now you’re staring at the aftermath: a mountain of jagged fiberglass, splintered 2x4s, a tangle of pipes, and that surprisingly heavy motor. This is the part of the job that catches most people off guard.
Dealing with this pile of junk is the final hurdle, and you can’t just drag it to the curb with your weekly trash. The sheer volume and awkward shapes of the debris require a solid plan. What you decide to do next will really come down to your budget, how much time you have, and your tolerance for heavy lifting.
Your Primary Disposal Options
You’ve got a few ways to tackle the cleanup. The most common DIY approach is loading it all up yourself and hauling it to the local dump or transfer station. You'll definitely need a truck or a decent-sized utility trailer for this. A quick tip: call them first. Some facilities have specific rules—and fees—for construction debris.
Another route, especially if you have more than just the tub to get rid of, is renting a small dumpster. For a single jacuzzi tear-out, a 10-yard dumpster is usually the perfect size. The rental company drops it off, you toss everything in, and they come back to haul it away. It costs more, but the convenience is hard to beat.
Thinking Green: Recycling Your Jacuzzi Parts
Believe it or not, a lot of that old jacuzzi can be kept out of a landfill. With just a little bit of effort sorting through the pile, you can recycle a surprising amount of it.
Here’s a quick breakdown of what to look for:
- The Motor and Pump: These are packed with valuable metals like copper and steel. Most local scrap yards will gladly take them off your hands and might even give you a few bucks for them.
- Brass Fittings: Check the plumbing connections for brass pieces. These are also valuable for scrap recycling.
- PVC Piping: Many recycling centers accept rigid PVC, but you’ll want to confirm their specific rules before you go.
- Wood Framing: If the wood from the support frame is untreated, it can often be recycled or even repurposed for another small project.
Taking the time to sort these items does more than just clear your conscience. It reduces landfill waste and puts valuable materials back into circulation. It's a small effort that makes a big impact.
When to Call in the Junk Removal Pros
Let's be honest—lugging sharp, heavy, and awkward debris is probably the least fun part of this project. It's also where you're most likely to strain your back or get a nasty cut. This is exactly why professional junk removal services exist.
Hiring a pro team means you don't have to touch any of it. They do all the lifting, loading, and hauling. This makes a lot of sense when you consider the average hot tub weighs 600 pounds empty, and some can easily clear 1,000 pounds. Handling that kind of weight and bulk safely is a real challenge. For more insights, you can check out some industry data on hot tub removal services and trends.
Companies like D&B Complete Home Services INC. make this final step completely painless. We focus on responsible disposal, making sure everything that can be recycled is. You can learn more about our process by checking out our professional junk removal services. It’s the fastest and safest way to wrap up your project and get your space back.
Now for the Aftermath: Prepping Your Space for What's Next
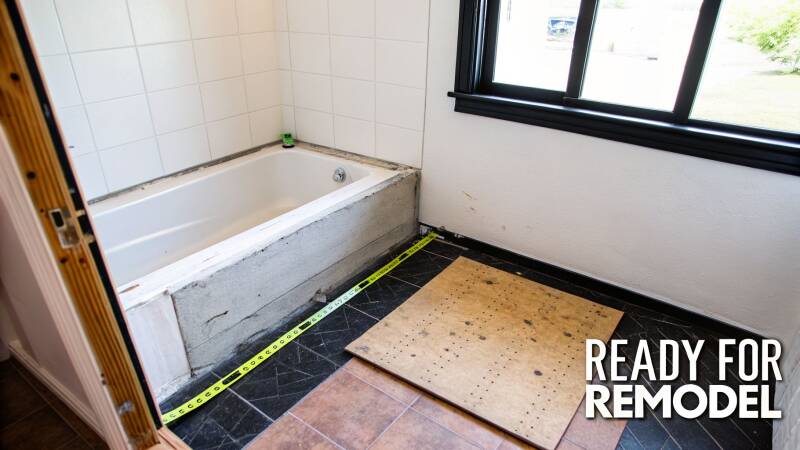
Alright, the beast is out. You're now looking at a blank canvas, but it’s probably a bit rough around the edges. This is where the real renovation work begins. Taking your time to properly prep the subfloor, walls, and plumbing at this stage is absolutely crucial. It's the difference between a new shower that lasts a lifetime and one that causes major headaches down the road.
The first thing you’ll probably see is the "ghost" of the old tub's footprint on the subfloor. It's rarely a pretty sight. Over the years, even the smallest splashes or a slow, undetected leak can cause water stains, soft spots, or even serious rot in the plywood.
Getting the Subfloor Solid Again
Time to put on your detective hat. Get down on the floor and give that entire area a thorough inspection. A great trick I use is to take the tip of a screwdriver and poke around any discolored or funky-looking spots in the plywood.
If the wood feels soft, gets spongy, or just crumbles under a little pressure, you’ve found water damage. That section must be replaced. Trust me, trying to cover it up is a recipe for disaster—you're just inviting mold and creating a weak spot in your floor. Don’t cut corners here.
For minor gouges or small holes in otherwise solid plywood, a good wood filler or epoxy will do the job. But for any wood that’s lost its integrity, you've got to cut it out.
- Mark the Damage: Grab a straight edge and draw a clean square or rectangle around the bad spot. Make sure your lines extend over to the center of the nearest floor joists for solid support.
- Set Your Saw Depth: Adjust your circular saw blade so it cuts just through the subfloor—you don't want to slice into the joists below.
- Cut and Pry: Carefully follow your lines with the saw, then use a pry bar to pop out the damaged piece.
- Patch It Up: Measure and cut a new piece of plywood of the same thickness to fit neatly in the hole. Use construction adhesive and screws to secure it firmly to the joists.
A rock-solid, perfectly level subfloor is the foundation for everything else. Get this part right, and your future tile or shower pan will install beautifully and stay trouble-free for decades.
Dealing with the Walls
Just like the floor, the walls that were hiding behind the tub surround are going to need some serious TLC. You're likely looking at a mess of old adhesive, holes where the faucet and controls came through, and maybe some beat-up drywall.
How you repair this depends entirely on what you're planning to install next. If a gorgeous new tiled shower is in the plans, you need to think about waterproofing from the studs out.
- For Wet Areas: If these walls will be inside the new shower, the best practice is to cut out the old drywall and replace it with cement backer board. It's designed to handle moisture and gives your tile a stable surface to bond to.
- For Dry Areas: For any walls outside the direct splash zone, standard moisture-resistant drywall (often called "green board") will work just fine. Cut your patches to fit, use mesh tape and joint compound to seal the seams, and feather the edges until it's perfectly smooth.
This is also your golden opportunity to add those little custom touches. Ever wanted a built-in shower niche for your shampoo bottles? Now is the time to frame it out while the walls are open.
Sorting Out the Plumbing and Drain
Here's a hard truth: the plumbing from an old jacuzzi almost never lines up perfectly for a new fixture. The drain might be in the wrong place for a standard tub, or you'll have extra water lines from the old jets that are now useless.
This is where many a confident DIY-er gets stuck. Moving a drain isn't just a simple fix; it often means cutting into the subfloor and re-routing pipes, all while maintaining the proper slope for drainage. Those old water lines for the jets can't just be capped with a valve—they need to be properly cut and sealed within the wall to prevent a catastrophic future leak.
If you're just swapping one tub for a similar-sized one, you might get lucky with minor adjustments. But if you're converting to a walk-in shower, you can bet that drain will need to be moved. Since a single plumbing mistake can cause thousands in water damage, this is one step where calling in a pro is an incredibly smart move.
To see just how big of a difference this foundational work makes, take a look at some of these bathroom remodel before-and-after projects and imagine the possibilities for your own space.
Answering Your Top Jacuzzi Removal Questions
Even after you've mapped out the project, it's completely normal to have some lingering questions. Taking on a jacuzzi removal is a serious undertaking, and you might be second-guessing the timeline, worrying about what could go wrong, or just wondering if you're in over your head. Let's tackle some of the most common questions we get from homeowners.
How Long Does This Project Really Take?
Honestly, the timeline can be all over the map. If you're an experienced DIYer and have all the tools ready to go, you could probably get a standard acrylic drop-in tub out in about 6-10 hours. For most people, that means dedicating an entire weekend to the job once you factor in prep, the actual demolition, and a thorough cleanup.
But that's the best-case scenario. Run into a stubborn plumbing connection or find out your tub is heavy cast iron, and you're suddenly looking at a multi-day project. The same goes for carefully disassembling a large tile deck. For comparison, a professional crew like ours can typically have the whole thing removed and hauled away in just 2-4 hours. That's the difference experience and specialized equipment make.
Can I Save the Surrounding Tile?
Maybe, but it requires a surgeon's touch and a whole lot of patience. This is definitely not a job for a sledgehammer. You'd need to meticulously score and cut every inch of grout and caulk sealing the tub to the tile.
Once it's free, the real challenge is getting it out. You’ll have to deconstruct the tub's support frame, usually through a small access panel or from the basement below, then carefully lower and slide the entire unit out. It’s far more painstaking and time-consuming than just breaking the tub apart.
In our experience, some minor tile damage is almost unavoidable, especially right at the tub's edge. It's always a smart move to plan for some small repairs or, better yet, have a few matching tiles on hand just in case.
What's the Hardest Part of Removing a Jacuzzi?
Most homeowners find two things particularly tough. First is simply the brute force required. Even when you cut a tub into smaller pieces, the sections are still incredibly awkward and heavy. Maneuvering those bulky, sharp-edged chunks of fiberglass through your house without scratching walls or floors is a real struggle.
The second, and often more frustrating, challenge is hitting an unexpected snag. This is what can turn a weekend project into a week-long headache:
- Finding a plumbing fitting that's so corroded it refuses to budge.
- Pulling the tub out only to discover hidden water damage and rotted subflooring.
- Realizing the electrical wiring is more complex than you anticipated.
This is where calling in a pro really pays off. An experienced team has seen it all before. They have the right tools and know-how to solve these problems on the spot without causing more damage, turning a DIY disaster into a minor hiccup.
Feeling like this might be more than you bargained for? Let the experienced team at D&B Complete Home Services INC. handle the heavy lifting and complex details. Get in touch today for a hassle-free removal.
Add comment
Comments